
Adobe Photoshop was created by Thomas and John Knoll in the summer of 1988. Adobe purchase the program and the first license was release in October 1988.
Here is the table showing the Adobe Photoshop history
Adobe Photoshop History
Photoshop is image editing software that allows the user to produce complex images, before Photoshop was used as photographic editor, but nowadays, it is also used in photo retouching application with a wide variety of functionality as an overall graphics tool.
Image-editing is the process of changing or modifying a bitmapped image, usually with an image editor.
Photo-retouching is the process of repairing defects, removing dust and scratches, correcting color, and removing unwanted elements from images.
JPEG - Joint Photographic Experts Group. This can display more than 16 million colors in a single image.
PNG - Portable Network Graphic.
GIF - Graphic Interchange Format. This can display up to 256 colors.
BMP is a standard Windows bit-mapped graphic image file format
PDF - Portable Data File
CMYK - mode defines colors according to their percentages of cyan, magenta, yellow and black - the four printing inks.
Pixel – This comes from the word Picture Element (PEL). A pixel is the smallest portion of an image or display that a computer is capable of printing or displaying.
Resolution - Refers to the sharpness and clarity of an image. In a computer monitors, the screen resolution signifies the number of dots (pixels) on the entire screen. A 640-by-480 pixel screen is capable of displaying 640 distinct dots on each of 480 lines, or about 300,000 pixels.
Image Ready - Another application that comes with Photoshop which is used to create specific types of Wev Graphics.
Context Sensitive Item- These are the buttons located at the Context Sensitive Menu which changes depending on what tool is selected in the Toolbox
Layers - These are sheets or levels in the images that segregate image component. Layer will allow the user to edit portions on the image.
Context Sensitive Item- These are the buttons located at the Context Sensitive Menu which changes depending on what tool is selected in the Toolbox
Layers - These are sheets or levels in the images that segregate image component. Layer will allow the user to edit portions on the image.
Preset Workspaces – This option is located in the Window Menu under Workspace where it allows you to save your preferred working environment.
Metadata - This is the information about the file such as the file author, file size and date created.
Camera Raw - An image file captured using a digital camera which contains minimal processed data.
Active Window- The active window is an open window currently in used.
Aspect Ratio - is the proportion of the object's height to its width. For example, a square has an aspect ratio of 1-to-1.
Blur - is an editing tool in Photoshop that diffuses the contrast between neighboring pixels.
The Photoshop work space consists of the following:
1. Toolbox – This box consisting of different buttons which allows you to select, move and edit, manipulate and view images.
Floating palettes – These are independent groups of related tools and options that can be displayed on the Photoshop workspace.
3. Menu bar – This bar located on the upper window below the title consisting nine menus, with additional submenus and command options.
4. Options bar – This bar is usually located below the menu bar and changes its options as you select a tool on the toolbox.

How to create a new Photoshop Document
There are different ways to create a new Photoshop Document here are some;
A. Use the File Menu
Steps:
1. Access File Menu
2. Click New

Photoshop is image editing software that allows the user to produce complex images, before Photoshop was used as photographic editor, but nowadays, it is also used in photo retouching application with a wide variety of functionality as an overall graphics tool.
Image-editing is the process of changing or modifying a bitmapped image, usually with an image editor.
Photo-retouching is the process of repairing defects, removing dust and scratches, correcting color, and removing unwanted elements from images.
PNG - Portable Network Graphic.
GIF - Graphic Interchange Format. This can display up to 256 colors.
BMP is a standard Windows bit-mapped graphic image file format
PDF - Portable Data File
CMYK - mode defines colors according to their percentages of cyan, magenta, yellow and black - the four printing inks.
Pixel – This comes from the word Picture Element (PEL). A pixel is the smallest portion of an image or display that a computer is capable of printing or displaying.
Resolution - Refers to the sharpness and clarity of an image. In a computer monitors, the screen resolution signifies the number of dots (pixels) on the entire screen. A 640-by-480 pixel screen is capable of displaying 640 distinct dots on each of 480 lines, or about 300,000 pixels.
Image Ready - Another application that comes with Photoshop which is used to create specific types of Wev Graphics.
Context Sensitive Item- These are the buttons located at the Context Sensitive Menu which changes depending on what tool is selected in the Toolbox
Layers - These are sheets or levels in the images that segregate image component. Layer will allow the user to edit portions on the image.
Image Ready - Another application that comes with Photoshop which is used to create specific types of Web Graphics.
Context Sensitive Item- These are the buttons located at the Context Sensitive Menu which changes depending on what tool is selected in the Toolbox
Layers - These are sheets or levels in the images that segregate image component. Layer will allow the user to edit portions on the image.
Preset Workspaces – This option is located in the Window Menu under Workspace where it allows you to save your preferred working environment.
Metadata - This is the information about the file such as the file author, file size and date created.
Camera Raw - An image file captured using a digital camera which contains minimal processed data.
Active Window- The active window is an open window currently in used.
Aspect Ratio - is the proportion of the object's height to its width. For example, a square has an aspect ratio of 1-to-1.
Blur - is an editing tool in Photoshop that diffuses the contrast between neighboring pixels.
The Photoshop work space consists of the following:
1. Toolbox – This box consisting of different buttons which allows you to select, move and edit, manipulate and view images.
Floating palettes – These are independent groups of related tools and options that can be displayed on the Photoshop workspace.
3. Menu bar – This bar located on the upper window below the title consisting nine menus, with additional submenus and command options.
4. Options bar – This bar is usually located below the menu bar and changes its options as you select a tool on the toolbox.
 |
The Adobe Photoshop
CS5 Window Elements
|
Activity for Students and Teachers


Click here to download the printable form


Click here to download the printable form

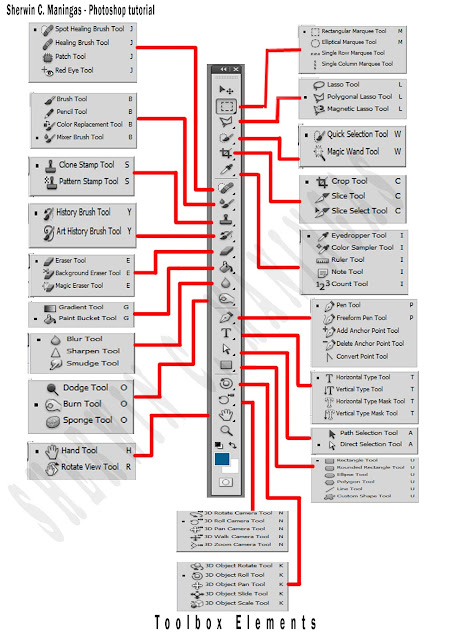
The Toolbox Elements
Gripper Bar – this is a handle
used to easily move menus, palettes, options bar and toolbox anywhere in
Photoshop Window. Click and hold down the left mouse button at the gripper bar
and use dragging to move the bar to another location.
There are different ways to create a new Photoshop Document here are some;
A. Use the File Menu
Steps:
1. Access File Menu
2. Click New
B. Use the keyboard shortcut combination
1. Press Ctrl + N
2. On the New Dialog Window, Type the Name, Set the size, resolution and color mode of the Document.

How to save in Adobe Photoshop
Saving in Adobe Photoshop could be done in different way and in file could be save in different format. It is recommended to save your file in Photoshop document (psd) first before saving it to other format in order to preserve all the features you applied in your document like layers, effects, colors, text and other editing tools.
To save your Photoshop document (psd) follow the following steps
1. Click File and Click save (Ctrl+S)


How to Create New Layer
By default, New Photoshop Document already have the default background layer. There are many ways to create a new layer.

You can create new layer using the Layer Menu. Follow these steps
1. Click Layer
2. Click New
3. Cick Layer

The New Layer Dialog Window will appear. Rename the default name (Layer 1) on the name box. You can also set the color and blending modes. Click OK if your done.
 Creating Layer could be done also by clicking the Create New Layer button below the Layer palette

Then you will see a new layer will be created. The default name is Layer 1. You could rename this if you want

Renaming Layer
To Renane the layer, you could right click on the layer and click Layer Properties then on the Layer Window, rename it and click OK

Another way of renaming the layer is by double clicking the Layer name and when you see the blinking cursor, rename it.

C. Inserting Images
D. Removing Background using quick selection and magic wand tool
E. Resizing Image
F. Saving as psd as image file (jpeg and png format)


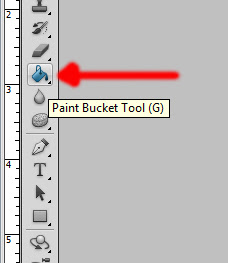
3. Click the Paint Bucket Tool in the toolbox
4. Click on the background layer.


Saving in Adobe Photoshop could be done in different way and in file could be save in different format. It is recommended to save your file in Photoshop document (psd) first before saving it to other format in order to preserve all the features you applied in your document like layers, effects, colors, text and other editing tools.
To save your Photoshop document (psd) follow the following steps
1. Click File and Click save (Ctrl+S)

2. On the Save as Window, choose the location where you want to save your file by clicking the drop down arrow on Save in box.

3. Rename your psd and click save. You can change the file format here by clicking the drop down arrow along File type format box.

By default, New Photoshop Document already have the default background layer. There are many ways to create a new layer.

1. Click Layer
2. Click New
3. Cick Layer

The New Layer Dialog Window will appear. Rename the default name (Layer 1) on the name box. You can also set the color and blending modes. Click OK if your done.


Then you will see a new layer will be created. The default name is Layer 1. You could rename this if you want

To Renane the layer, you could right click on the layer and click Layer Properties then on the Layer Window, rename it and click OK


Creating a Bookmark in Photoshop
In this lesson you will learn how Bookmark is created using Adobe Photoshop. Below is the final output of a bookmark and we will also discuss how the following will be done in Adobe Photoshop.
A. Inserting Layer
B. Inserting and Formatting TextC. Inserting Images
D. Removing Background using quick selection and magic wand tool
E. Resizing Image
F. Saving as psd as image file (jpeg and png format)
Ok let's begin with Creating a new Photoshop Document of a Bookmark. Follow the following steps
Create a 2 inches width by 6 inches height, set the resolution to 300 and white background.

To Change the Foreground Color, follow the following steps;
1. If you want to change the background color, Click the Set the Foreground Color in Toolbox

2. Choose a color in the Color Picker (Foreground Color) Window then click OK

3. Click the Paint Bucket Tool in the toolbox

4. Click on the background layer.

Now let us learn how to Insert and Format text on our Photoshop Document. Follow these steps
1. Click the Horizontal Type Tool in the toolbox so we can insert a text for our quotation.

2. Set the text color into your desired color

3. Click and drag your mouse to the canvas area to insert text, then type your quotation.

4. Type the text or your quotation

5. To format the text, you can use the Character window. To show the character window, click Window then click Character. From here you can change the Font style, size, color Line spacing, Character spacing and other text formatting.

To Insert an Image for our Bookmark, do the following:
1. Click File then click Open.

2. Select the picture for your psd then click OK.

3. SELECT ALL the picture, do this by pressing Ctrl + A, press and Ctrl + C to COPY then go back to your psd and press Ctrl + V to PASTE it on a new layer.

To Resize the Image, do the following steps:
1. Press Ctrl + T (transform) on the image (thomas jeferson) layer

2. Set the image to your desired size and location use the Move Tool to move the image.

To Remove the Background from our image, do the following:
1. Click the Quick Selection tool in the toolbox.

2. Select the backround on the image layer

3. Let us also delete some portion of or image, you can also use the Magic wand tool in the toolbox.

4. Now click on the black are on the image layer, but do not delete yet.

5. Select the background layer and press delete.
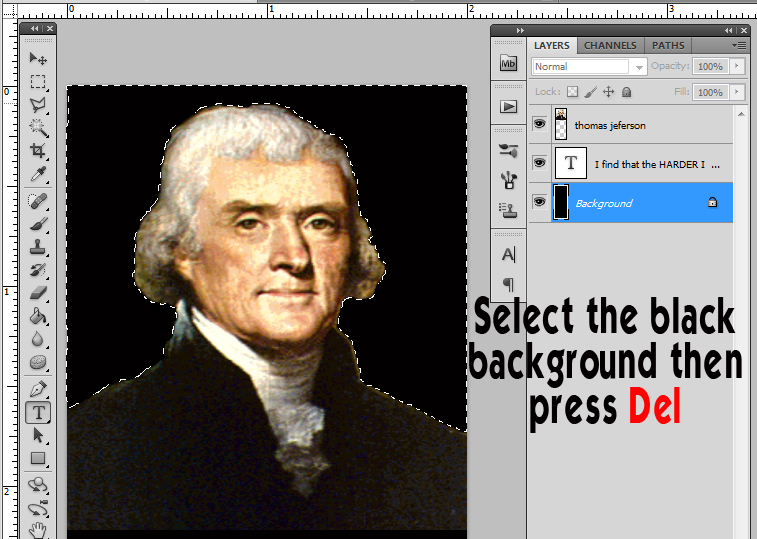
6. Since you deleted the image background, and some portion of your background, your psd should look like below.

Now we have the finish output. you may now use this as your bookmark for printing.

it helps a lot!
ReplyDeleteno its not
Deleteyahhh it is just a simple >.<
DeleteVERY HELPFUL. I rated this 5 stars :)
DeleteSir Sherwin'S Computer Tutorial: Adobe Photoshop Tutorial >>>>> Download Now
Delete>>>>> Download Full
Sir Sherwin'S Computer Tutorial: Adobe Photoshop Tutorial >>>>> Download LINK
>>>>> Download Now
Sir Sherwin'S Computer Tutorial: Adobe Photoshop Tutorial >>>>> Download Full
>>>>> Download LINK Tr
Very informative post. Keep up the good work. I would really look forward to your other posts
ReplyDeleteDell - Inspiron 15.6" Laptop - 4GB Memory - 500GB Hard Drive - Black (15RV-8667BLK)
Dell - Inspiron 17.3" Laptop - 4GB Memory - 500GB Hard Drive - Black (17RV-6273BLK)
The only think i disliked was that the page was really too big and need to scroll all the time. you can visit Clipping Path Service
ReplyDeletewow.... your site fulfil my all requirements..thanks for this amazing information.... Adobe Photoshop CC 2018
ReplyDeleteI found this is an informative and interesting post so i think so it is very useful and knowledgeable. I would like to thank you for the efforts you have made in writing this article. clipping mask photoshop
ReplyDeleteMP3 converter is an all pervasive device which might certainly assist in changing teams of MP3 file formatting. With the assistance of this device you may simply format and obtain music to make issues sound all of the extra nice and musical. If you want to learn more about this topic please visit onlineconvert
ReplyDeleteThanks For this Blog, Very Helpful
ReplyDeleteDell service center in JB Nagar
Dell service center in Lamington Road
Dell service center in Dahisar
Dell service center in Antop Hill
Dell service center in Jankalyan Nagar
Dell service center in Anushakti Nagar
Dell service center in Marol
Sir Sherwin'S Computer Tutorial: Adobe Photoshop Tutorial >>>>> Download Now
ReplyDelete>>>>> Download Full
Sir Sherwin'S Computer Tutorial: Adobe Photoshop Tutorial >>>>> Download LINK
>>>>> Download Now
Sir Sherwin'S Computer Tutorial: Adobe Photoshop Tutorial >>>>> Download Full
>>>>> Download LINK TN
Very much informative photoshop tutorial.
ReplyDeleteclipping path
Neck Joint Service
Background Removal Service
This comment has been removed by the author.
ReplyDeleteBook Marketing Services
ReplyDeleteHello I like your important articles and your website is very useful and beautiful for step by step editing information and editing methods in this site and tell header and footer in this site i have an editing site for you i ask to share apps to a photoshop background
ReplyDelete