
Maintaining a Public School Computer Laboratory is a big challenge to us. In our school, and I know other schools had this same problem. How they will maintain the computers being donated to them without any technical support or any financial support? Computer programs and computer parts do malfunction, and when they do, we in a public school do not have any fund to buy for a replacement, pay for the repair or hire a computer technician. We wanted all our students to have a one is to one computer ratio so they could understand more the lesson and enhance their skills in operating a computer. But when computer parts failed to function and it is really happening to our computers and I bet in others too, our students will just share with limited number of computers. The result? Lessons and Hands on Activities will be longer because students need to wait for their turn. So For one semester, few of our lessons were mastered by our students.
So to prevent the computers in our computer laboratory easily malfunction because of viruses, corrupted files and also to prevent the loss of data, we do some maintenance for these donated computers. Here are some:
Strict implementation of important rules in computer laboratory. Below are our rules and regulations
1. Fall in line when getting inside the computer laboratory room.
2. No foods and drinks inside the computer laboratory.
3. Do not replace, move or unistall devices or programs of the computer.
4. Installing devices or programs are prohibited.
5. Do not open, read, change, rename or delete other files except your own.
6. Online or offline games are prohibited.
7. Maintain cleanliness inside the computer laboratory room.
8. Observe silence and proper behavior especially when classes or hands-on activities are going on.
To maintain the god performance of our computers, we do system maintenance, these are
· Deleting unused files
· Uninstalling unused programs
· Scanning for Viruses /Deleting or Removing viruses
· Performing Disk Clean-up
· Performing Disk Defragmenter
· Setting up a restore point
· Back up important files · Back up system for easy restoration
Watch the presentation below on how to perform basic computer maintenance
View more presentations from kapitanbasa
For easy system restoration, we do disc imaging and disc cloning so it will be easy for us to restore the system being infected by a virus or experience corrupted files resulting to boot failure. Disc imaging is one technique in backing up the system by converting the system into an image file and saving this file on a safe location. When computer crash, we just restore this image file and the original system will be restored. If you want to know how it is done, follow this link
Another Maintenance Solution and back up Solution is disc cloning. Since we do have computer units with same specifications, It was an easy task for us to bring back the system because we can just clone the entire disc of one unit to other units. If you do not want to spend your time on reformatting and re-installing process, I advice you to know how this is done. Follow the link below for the tutorial
HOW TO CLONE A HARD DISC DRIVE
I also trained some of my students interested in computer repair, so they could also help in maintenance and at the same time, learned from what they are doing. In fact, I already have former students who is now offering a computer repair and related services to other people and they earned money from it. They also served as a computer mentor with other students and teachers in need of help in operating a computer. That is why I am planning to put up a club in school. This club will be the Student Support Computer Technician Club and I am hoping this will be approved and be recognized.
RESTRICTING HARD DISK DRIVE PARTITION TO OTHER COMPUTERS IN A NETWORK
In our school, students are saving the copy of their files in a computer where we check. Also teachers are saving the copy of their grades to that computer so I decided to assign the Drive C for teachers and Drive D for students. That is why students should not access Drive C, so I restrict them in sharing and security.
Here are the steps in restricting other computer to access a specific drive on a computer.
Step 1. Create Multiple User Accounts with password.
Create user account that can access all the drive (partition) and another user account that will be restricted to access a specific drive.

Make sure you created the account as administrator and make the password unique.

For the account that will only access one drive or partition, make a user account and set it as Standard user. Create also a password for this account which must be different from the administrator account.

Step 2. Turn On Password Protective sharing on Network and Sharing Center.
Go to Network and Sharing Center.

Click Advance sharing settings.

Choose turn on password protective sharing.

Step 3. Set sharing policy access to all user accounts.
Right click on the drive that you want to share, choose Share with and click Advanced sharing

Click Sharing tab and click Advanced Sharing button

on Advanced Sharing window, Click permissions

Add the user Administrator account and set the Permissions to Full Control

Add the Standard user and set the Permission to Deny. Since this user account should not allowed to access this drive it should be set to Deny or not allowed to change, view or modify.

Step 4. Test the connection and access control on other computers.
Using other computer, access the computer on a network and use the administrator user account and password.

You should have access to both drive that where you set Full Control.


Test also the account for students in other computers using the standard user and password.

Standard users should have no Access to Drive where you set the permission to "Deny"
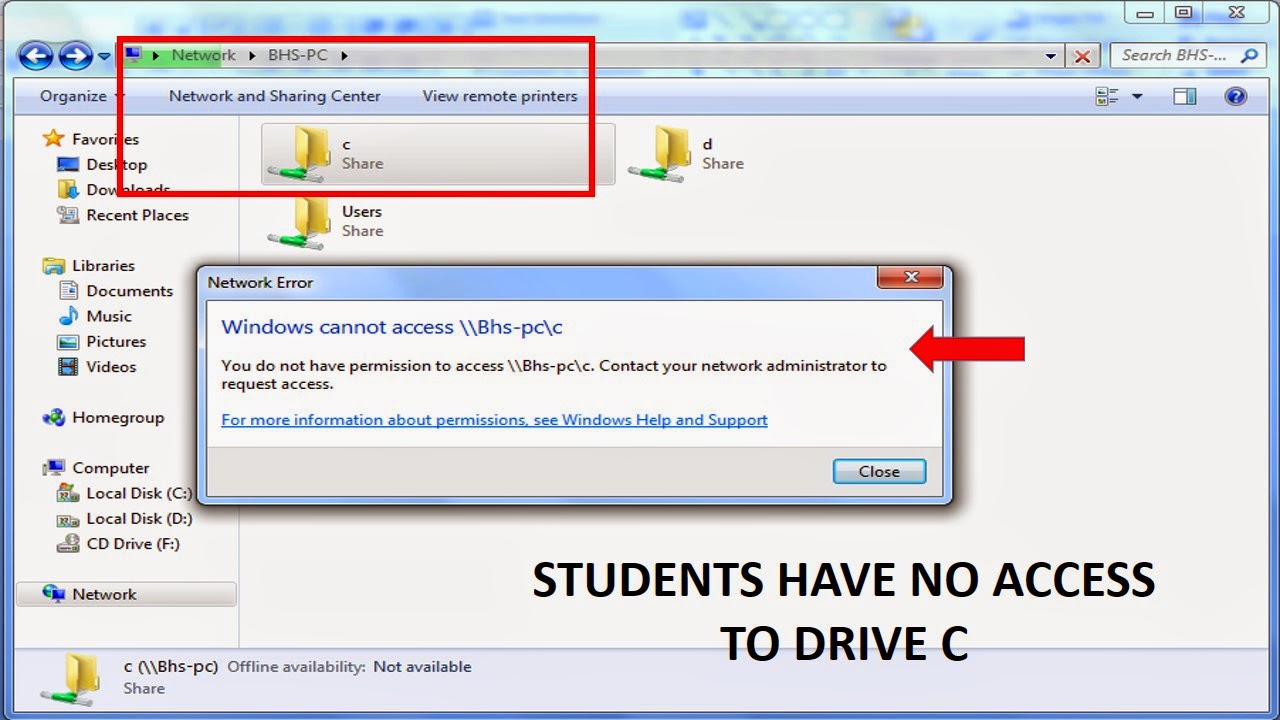
Only drive that is set to Full controll should be access by the standard users.

I also trained some of my students interested in computer repair, so they could also help in maintenance and at the same time, learned from what they are doing. In fact, I already have former students who is now offering a computer repair and related services to other people and they earned money from it. They also served as a computer mentor with other students and teachers in need of help in operating a computer. That is why I am planning to put up a club in school. This club will be the Student Support Computer Technician Club and I am hoping this will be approved and be recognized.
RESTRICTING HARD DISK DRIVE PARTITION TO OTHER COMPUTERS IN A NETWORK
In our school, students are saving the copy of their files in a computer where we check. Also teachers are saving the copy of their grades to that computer so I decided to assign the Drive C for teachers and Drive D for students. That is why students should not access Drive C, so I restrict them in sharing and security.
Here are the steps in restricting other computer to access a specific drive on a computer.
Step 1. Create Multiple User Accounts with password.
Create user account that can access all the drive (partition) and another user account that will be restricted to access a specific drive.
Make sure you created the account as administrator and make the password unique.
For the account that will only access one drive or partition, make a user account and set it as Standard user. Create also a password for this account which must be different from the administrator account.
Step 2. Turn On Password Protective sharing on Network and Sharing Center.
Go to Network and Sharing Center.
Click Advance sharing settings.
Choose turn on password protective sharing.
Step 3. Set sharing policy access to all user accounts.
Right click on the drive that you want to share, choose Share with and click Advanced sharing
Click Sharing tab and click Advanced Sharing button
on Advanced Sharing window, Click permissions
Add the user Administrator account and set the Permissions to Full Control
Add the Standard user and set the Permission to Deny. Since this user account should not allowed to access this drive it should be set to Deny or not allowed to change, view or modify.
Step 4. Test the connection and access control on other computers.
Using other computer, access the computer on a network and use the administrator user account and password.
You should have access to both drive that where you set Full Control.
Test also the account for students in other computers using the standard user and password.
Standard users should have no Access to Drive where you set the permission to "Deny"
Only drive that is set to Full controll should be access by the standard users.

This is a valuable post. Thanks for share.
ReplyDeletecomputer repair delray beach
Youur the best
ReplyDelete