Showing posts with label CMOS. Show all posts

14.7.10

All about CMOS and BIOS

CMOS is short for Complementary Metal Oxide Semiconductor. CMOS is responsible for storing the date, time, system setup and other small functions. They are used at the start of a boot process in a computer system that is why it requires a small battery on the system board that provides power to the CMOS chip, even while the computer is turned off so it will not loose all data save on it.

The program saved inside the CMOS is called BIOS, short for Basic Input Output System. BIOS is the program capable for storing the date, time, system setup and other small functions. Through the BIOS, user can configure devices at the start of a boot process in a computer system.

The BIOS is useful especially if the user needs to reinstall a new operating system on the computer. User need to access first the BIOS and configure what it is needed to.

BIOS of new motherboard can be access by pressing any of the following keys on your keyboard during the boot up process.
  • F1
  • F2
  • DEL
  • ESC
  • F10
After pressing the correct key, you should be redirected to BIOS settings screen. below are different examples of BIOS settings screen.


In this type of BIOS, the menus are listed. System time and date could be access by selecting the first option and press enter.


After you press enter key, you should be redirected to this screen where you could change the time and date and see system information about your hard disk drive and other devices.


One important option is the boot sequence which could be configure on this screen. change the values by selecting it and pressing enter and use the arrow keys or press + and - sign.


Another type of BIOS is just like this one above. The menus are in tab format and you could select each menu by pressing right and left arrow key.


The boot sequence could be access under BOOT menu. change the values by pressing enter.

Remember: If you are using a bootable disk as your medium, the boot sequence must by like this:

First Boot Device: CD or DVD
Second Boot Device: HDD

And if you are booting on a bootable flash drive, just change the first boot into USB, then after the reinstallation, you should change again the boot order into this sequence:

First Boot Device: HDD
Second Boot Device: CD or DVD

HOW TO RESET BIOS PASSWORD

Sometimes BIOS is inaccessible due to due hardware related issues such as electrical problems or due to inadvertence, such as someone set and then forget the password and the only way is to reverse this. This can be time consuming or frustrating depending upon the motherboard manufacturer and model of the motherboard. So here is my guide if ever this would happen to you. follow my procedure on how to reset or disable the BIOS password.

  1. Read about you motherboard manual and Locate, if possible, the instruction booklet for BIOS jumper setting of your motherboard. If you don't have the manual, then use this site - motherboard references
  2. Make sure you shut down your computer and unplug the power cable from the outlet.
  3. Locate where the BIOS jumpers are located.

4. Take note of the present pin location and the location of the jumper on those pins to determine their default location. Write it down so you will not forget!
5. Move the jumpers from the their default location . From pins #1 and #2 , place the jumper across pins #2 and #3.

6. Leave the jumper in place for 20 to 30 seconds and then return it to its default location
7. Plug the power cord back in and restart the computer.
8. During it's startup (boot) process, press the DEL, F10 or F1 key, (depending on your computer) to get into the Bios/CMOS setup. If you don't know how to access the BIOS, follow this link - Bios Basics
9. The Bios password should be gone!


Enhanced by Zemanta

1.7.10

PARTS OF A MOTHERBOARD


PARTS OF A MOTHERBOARD
1. CPU HOLDER is a portion in the motherboard which holds the CPU (Central Processing Unit) or simply as processor.


2. MEMORY (RAM) HOLDER or MEMORY SLOT. This is the slot where you will insert the memory module or memory card. Some motherboard comes with two to four slots. Aside from the motherboard specification, looking at the memory slots would help you to know which type of memory card is compatible.


3. POWER SUPPLY CONTROLER is the portion where you can connect the power supply unit (PSU) cable connector. Motherboards come with different power supply controller. Old motherboard needs AT power supply unit while new motherboard needs ATX power supply


4. CHIPSET is the base or platform that supports and provides data-transfer connections between the processor, memory, AGP, PCI-E, and PCI expansion cards, disk drives, and other peripheral devices.
A. North Bridge Chipset- this chipset handles the data-transfer duties of memory, CPU, and AGP and to make the most efficient use of available resources.


B. South Bridge Chipset- this chipset component provides support for a wide variety of devices with many differing bus speeds and designs. Control over secondary buses such as USB, IDE, PS/2, Ethernet is the Southbridge's main role.


5. CMOS:(Complementary Metal Oxide Semi-conductor) is also a chipset which contains the BIOS (Basic Input Output System). The BIOSis the built-in software that tells what a computer can do without accessing programs from a disk.


6. CMOS BATTERYis a battery that maintains the time, date, hard disk and other configuration settings in the CMOS memory. CMOS batteries are small and are attached directly to the motherboard.


7. IDE (Integrated Drive Electronics) CONTROLLER FOR HARD DISK DRIVE AND OPTICAL DRIVE are the connectors to which you will insert an IDE cable (supplied with motherboard). IDE cables connect devices such as hard drive, CD Drives and DVD Drives.


8. IDE CONTROLLER FOR FLOPPY DRIVE is smaller than the IDE controller of hard drive and optical drive. This is where you connect the floppy drive thru IDE cable.

9. SATA -Newest computer mother boards have the new interface called Serial Advance Technology Attachment (S-ATA). SATA has a faster transfer rate than ATA and only 1 device can be attached to it.


10. AGP(Accelerated Graphic Port)was designed specifically for AGP video cards. AGP provided a faster bus speed (66 MHz 1x - 133Mhz 2x - 266Mhz 4x effectively). AGP is a port not a bus unlike the ISA and PCI local buses because it is not expandable, it only involves the two devices the graphics card and the CPU.

11. PCI-EXPRESS:(Peripheral Component Interconnect Express)officially abbreviated as PCI-E or PCIe, is a computer expansion card standard introduced by Intel in 2004, and currently is the most recent and high-performance standard for expansion cards that is generally available on modern personal computers. PCIe was designed to replace PCI, PCI-X, and AGP. Unlike previous PC expansion standards, rather than being a shared parallel bus, it is structured around point-to-point serial links called lanes.


12. PCI:(Peripheral Component Interconnect)some pc’s have a number of PCI slots from 1 up to about 6. These PCI bus runs at 33Mhz and normally 32bits. The PCI bus was the first one to fully support plug and play, where IRQ's and other resources are set up by the OS and there are no need to alter jumpers etc on the hardware. You may insert different peripherals on PCI bus, from sound cards to DVD decoders and graphics accelerators.

14. Ports: These are plug-ins seen at the back of your system unit when the motherboard is placed inside it. The following are the common ports usually seen on a motherboard:
  • PS2 Ports

  • USB Ports

  • Serial Ports

  • Parallel Ports (Printer Port, VGA Port, Game Port )

  • Audio Ports

  • Ethernet port

  • Firewire port

Determine what CPU is compatible with your motherboard

Knowing the compatible processor for a motherboard is important for a technician because this information will help in case of upgrading or replacing the CPU. 

Upgrading means replacing the processor with another compatible processor but with higher capacity or speed.


Let us test your skills in identifying the parts of the motherboard! Answer the quiz below. Dont forget to type your full name. Goodluck!


Suggested Activities for students: 


Materials: 
  • Screwdriver
  • Thermal Grease
  • Brush 
  • Anti-Static wrist strap


Steps: 
1. Power off the system unit and unplug it from the outlet

2. Use the anti-static wrist strap in dis-assembly, assembly.

3. This system unit really needs to be clean, you could see the dust forming inside the CPU fan and heatsink

4. Remove the CPU fan and heatsink.


5. Clean the Dust using brush.

6. The dust in this heat sink will cause your system unit to over heat.

7. Clean the heatsink using brush. 

8. You might also need to clean the Power Supply Unit inside and outside using brush because too much dust might cause overheating too on electronic components.


9. Apply a thermal grease on the CPU.  


10. Remove all the parts and clean it using brush and lint free cloth.

11. Assemble the parts and test the system unit.


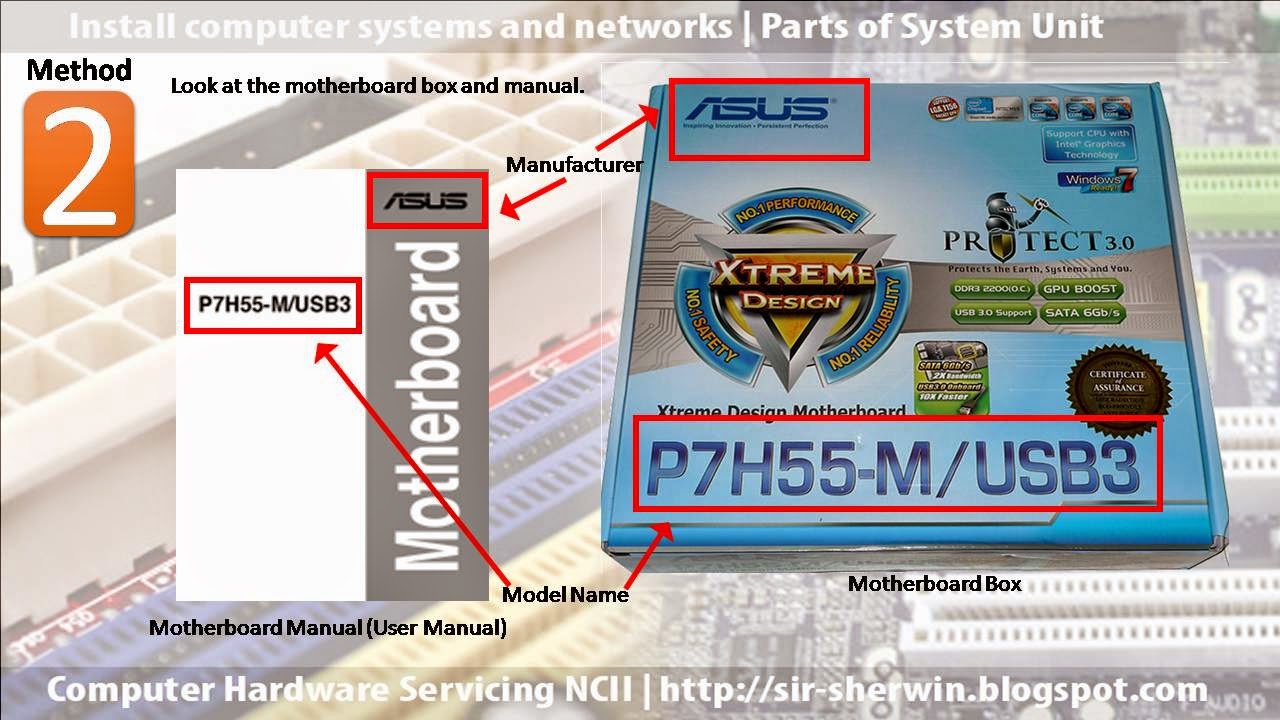
Motherboard Manufacturer refers to the name of a company that is producing and marketing a system board for computers.
Motherboard Model Name  may include series and model number of a motherboard.

Knowledge about a motherboard manufacturer and its model name will give a computer technician an information on the following:
1.Motherboard Manufacturer Website- It is important for a computer technician to know where to download a specific motherboard manual, drivers (device software) for motherboard devices, update for BIOS and other applications.
2.Compatible devices – The technician will easily identify compatible CPU, RAM, Video Card, HDD and other peripheral devices for a motherboard in case of upgrading or replacing parts.
3.Compatible Operating System – The computer technician could easily identify the compatible System Software and other application software for the motherboard.

Next will give you idea and procedure on “how to get the motherboard Manufacturer and Model name on a desktop system board".