Pages

19.10.11

Using Deep Freeze on your computer - A guide to computer technicians

Most of my students in Xavier Technical Training Center always ask me how they could maintain their computer running smoothly, and prevent the downtime on their units. Some of them were asking how they could prevent others who also use their laptop or desktop computers from changing any settings on it, installing some programs they don't want for example. In computer maintenance solution, aside from Group Policy Editor in Windows operating system, I recommend to them to use a third party program called "Deep Freeze". Deep Freeze is made by Faronics which when installed, Freeze the current system. In other words, if your computer will be "Deep Freeze", no changes will happen on the partition it will freeze. No changes means no users could install or uninstall software, Save, Delete any files even if that files is a bootable or program files. So your computer and your files save on it are safe. 

If you will use Deep Freeze especially in a computer shop, you don't need to install any anti-virus. It will be useless because as I said, when you Deep Freeze, any changes made on your computer will be revert to its current state after it will be reboot. Just Make sure you have back up your system before applying the Deep Freeze. This back up could be done either on Disk Imaging or Disk Cloning. 

Here is the tutorial on how to use Deep Freeze. Let us first learn how to install it.  Follow these steps: 

HOW TO INSTALL?

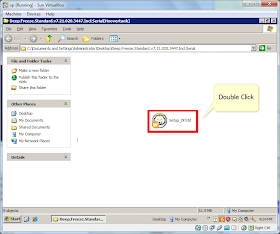
1. Double click the setup icon, in the Welcome Screen, you will learn that this installer will be use to uninstall it so do not delete the installer. Just save it on your computer so in case you need to uninstall the Deep Freeze, it will be easy. 

2. Tick the I Accept option and click next.

3. Enter the License Key then click Next.

4. Select the partition you want to "Freeze". On this part, you should think what is best on your computer. Most of computer shop owners do not create other partitions on their disk drive so the whole disk will be deep freeze. This is because they don't need to save anything on each units and it will be easy for them if they freeze the whole computer so they will have less monitoring on their client moves on each unit. Also, Daily maintenance will be lessen. For those who will use Deep Freeze on their personal computers, I advise them to create another partition from their hard disk drive. Then during the installation of deep freeze, just select the system partition. Leaving the other partition. This will allow the computer user to save their important files because only the system drive is freeze. 

5. Click Install button. After the installation, your computer will restart automatically.


HOW TO USE DEEP FREEZE? 

Secure your Deep Freeze. 
After installing the Deep Freeze, you need to set a password on it so others will not be able to change any settings on it. To do this, follow these steps:

1. Access Deep Freeze. You could access it using a keyboard shortcut combination CTRL + SHIFT + F6. or by holding the CTRL+SHIFT keys and double clicking the icon of a bear in notification area.

2. Set the password by clicking Password tab.

3. Enter the password then click Apply and reboot. Take note that if you want to change any settings in Deep Freeze, you need to reboot your computer.

4. Click OK.

5. Click YES to reboot your computer.

HOW TO DISABLE DEEP FREEZE? 
If there will be time that you need to do something on your computer, installing or uninstalling a software for example, and changes should be done, you need to disable the Deep Freeze First then reboot the computer. After the reboot you should notice that the icon of Deep Freeze in your notification area should be mark with X, and usually blinking. This means it is disabled. So changes on your computer will be done.

1. To disable Deep Freeze, Click Boot Thawed option and Click Apply and Reboot.

 2. If you want to enable it, just select again Boot Frozen then click Apply and Reboot.


HOW TO UNINSTALL DEEP FREEZE? 

If you need to uninstall the Deep Freeze on your computer, the installer you used must be run again. Do not forget to disable first the Deep Freeze. After running the installer,


2. Click Next to continue.

3. Then after clicking next, you should see the uninstall button, then your computer will restart automatically. After the reboot it should be successfully removed from your computer.

4.10.11

Common cause of Blue Screen of Death (BSOD)

What is Blue Screen of Death? 

Blue Screen of Death or BSOD for short is also known as a bluescreen because of a full blue screen generated by Microsoft Windows Operating System. 

What are the cause of Blue Screen of Death and how to Fix it? 

BSOD in computers might be a cause of Hardware or Software issue. Here are some of the cause of blue screen of death. 

1. Outdated, incorrect or corrupt drivers is one reason why the system encounter a STOP error, resulting in the BSOD. So to prevent this, try to re-install and update your system’s device drivers. Having the correct drivers ensure that all bugs are fixed and that all hardware has the correct driver.

2. Incorrect configuration of BIOS / BIOS failure. This is because of Windows update, installation of new hardware, overclocking, or you just  change  your systems configuration incorrectly. So simply load the default Bios settings. You could also reset the BIOS,  this way will result in a safe configuration to be used for your motherboard, CPU and memory. Bios may fail too due to overheating, over use or obsolete. 

3. Memory failure can easily cause blue screen errors, this is because of loose contacts of memory card to the slots of motherboard due to dust, or more often, defective RAM module. Cleaning the memory interface and memory slots could be one solution. Swapping other compatible memory is another options.  

4. Video Card Failure. Video card adapter can be a cause of BSOD if improperly installed in AGP or PCI-e Slot. Conflict in video card adapter drivers may cause blue screen, and overheating due to dust or the thermal paste in its heat-sink is already dry. 

4. Bad sectors in HDD. Bad sectors in Hard Disk Drive is either caused by bad or corrupted software or simply a failing hard disk drive and this is one reason why system encounter BSOD. We always recommend  a system restoration to verify without doubt that this is not a software issue. If after re-installing Windows, and updating it with all the latest updates, you continue to get this error we suggest swapping other compatible hard disk drive.


5.9.11

Detect if your username has been hacked

Do you want to know if your e-mail or social networking account has been hacked? More often, a computer user has the same password on more than one web page, So in order to know if your account was been used by other people try this website. ShouldIChangeMyPassword.com. This is a good website that has a database of several hundred thousand publicly posted hacked accounts and will report if your e-mail address is contained in its database.

5.8.11

How to Maintain a Public School Computer Laboratory without extra expenses

Maintaining a Public School Computer Laboratory is a big challenge to us. In our school, and I know other schools had this same problem. How they will maintain the computers being donated to them without any technical support or any financial support? Computer programs and computer parts do malfunction, and when they do, we in a public school do not have any fund to buy for a replacement, pay for the repair or hire a computer technician. We wanted all our students to have a one is to one computer ratio so they could understand more the lesson and enhance their skills in operating a computer. But when computer parts failed to function and it is really happening to our computers and I bet in others too, our students will just share with limited number of computers. The result? Lessons and Hands on Activities will be longer because students need to wait for their turn. So For one semester, few of our lessons were mastered by our students.

So to prevent the computers in our computer laboratory easily malfunction because of viruses, corrupted files and also to prevent the loss of data, we do some maintenance for these donated computers. Here are some:

Strict implementation of important rules in computer laboratory. Below are our rules and regulations


1. Fall in line when getting inside the computer laboratory room.
2. No foods and drinks inside the computer laboratory.
3. Do not replace, move or unistall devices or programs of the computer.
4. Installing devices or programs are prohibited.
5. Do not open, read, change, rename or delete other files except your own.
6. Online or offline games are prohibited.
7. Maintain cleanliness inside the computer laboratory room.
8. Observe silence and proper behavior especially when classes or hands-on activities are going on.

To maintain the god performance of our computers, we do system maintenance, these are

· Deleting unused files
· Uninstalling unused programs
· Scanning for Viruses /Deleting or Removing viruses
· Performing Disk Clean-up
· Performing Disk Defragmenter
· Setting up a restore point
· Back up important files · Back up system for easy restoration

Watch the presentation below on how to perform basic computer maintenance 
View more presentations from kapitanbasa
For easy system restoration, we do disc imaging and disc cloning so it will be easy for us to restore the system being infected by a virus or experience corrupted files resulting to boot failure. Disc imaging is one technique in backing up the system by converting the system into an image file and saving this file on a safe location. When computer crash, we just restore this image file and the original system will be restored. If you want to know how it is done, follow this link


Another Maintenance Solution and back up Solution is disc cloning. Since we do have computer units with same specifications, It was an easy task for us to bring back the system because we can just clone the entire disc of one unit to other units. If you do not want to spend your time on reformatting and re-installing process, I advice you to know how this is done. Follow the link below for the tutorial

HOW TO CLONE A HARD DISC DRIVE

I also trained some of my students interested in computer repair, so they could also help in maintenance and at the same time, learned from what they are doing. In fact, I already have former students who is now offering a computer repair and related services to other people and they earned money from it. They also served as a computer mentor with other students and teachers in need of help in operating a computer. That is why I am planning to put up a club in school. This club will be the Student Support Computer Technician Club and I am hoping this will be approved and be recognized.

RESTRICTING HARD DISK DRIVE PARTITION TO OTHER COMPUTERS IN A NETWORK

In our school, students are saving the copy of their files in a computer where we check. Also teachers are saving the copy of their grades to that computer so I decided to assign the Drive C for teachers and Drive D for students. That is why students should not access Drive C, so I restrict them in sharing and security.

Here are the steps in restricting other computer to access a specific drive on a computer.

Step 1. Create Multiple User Accounts with password. 

Create user account that can access all the drive (partition) and another user account that will be restricted to access a specific drive.


Make sure you created the account as administrator and make the password unique.

For the account that will only access one drive or partition, make a user account and set it as Standard user. Create also a password for this account which must be different from the administrator account.

Step 2.  Turn On Password Protective sharing on Network and Sharing Center. 

Go to Network and Sharing Center.

Click Advance sharing settings.

Choose turn on password protective sharing.


Step 3. Set sharing policy access to all user accounts. 

Right click on the drive that you want to share, choose Share with and click Advanced sharing

Click Sharing tab and click Advanced Sharing button

on Advanced Sharing window, Click permissions

Add the user Administrator account and set the Permissions to Full Control

Add the Standard user and set the Permission to Deny. Since this user account should not allowed to access this drive it should be set to Deny or not allowed to change, view or modify.

Step 4. Test the connection and access control on other computers. 

Using other computer, access the computer on a network and use the administrator user account and password.

You should have access to both drive that where you set Full Control.


Test also the account for students in other computers using the standard user and password.

Standard users should have no Access to Drive where you set the permission to "Deny"

Only drive that is set to Full controll should be access by the standard users.
Enhanced by Zemanta

6.5.11

Creating Disc image file with Nero

Most of my students always ask me how they could back up their installation disc. I recommended them to use Nero or any ISO converter so they could create an image file of their installers and other important files. An CD image file usually have a filename extension .iso, .nrg, .tib depending upon the software you use to create the image file.In this tutorial Nero burning software is used to create a backup image. Follow these steps:
1. Insert your Installation disc on your optical drive (DVD-RW Drive is recommended).
2. Start Nero and Select the type of disc. You could see it at the top. (See below)
3. Click Copy CD

4. Make sure you selected the current optical drive where you inserted the disc.

4.Then On the Destination drive, select Image recorder. This will allow you to save the burn files into your computer.


5. Click Copy to continue.

6. Then a dialog box should pop up, select a path where you want to save the image file then click save.

7. A message appear showing a successful copying. Click OK to continue.

8. There you go! You have now created a backup image file of your installation disc. Anytime you need it, just burn it back to a blank disc, preferably CD-R or DVD+R.

Enhanced by Zemanta

28.4.11

Disk Imaging Using Acronis True Image - Back up and maintenance solution for computer technicians

DISK IMAGING

All hard drive will fail, and if that happens to yours, it will be a big disaster on your file. So before you lost all of your important files, think of a way on how to backup it all. On this tutorial, I will show you how to backup your drive using a full backup of Acronis True Image on Hiren's 13.0.


1. Boot from your hiren's bootable CD. Select Hiren's BootCD 13.0 Rebuild by DLC Menu

2. Select backup menu. 


3. Select Acronis True Image Home 2011. 

4. Inside Acronis True Image Home 2011 window, Click Backup then choose Disk and Partition Backup. 


5. Select the partition you want to backup and click next. 

6. Now let us locate where to save our back up. Remember to know first the disk space used by the partition you are backing up and look for any partition larger than your backup. If you dont have any other partition, you could use an external storage device if possible. 


7. In this example, we will backup the drive C (containing system files) in local disk D. Type the filename and click OK. 


8. Click Create a new backup then click next to continue. 


9. After reviewing the summary of your actions regarding your backup, click Proceed. 


10. Click OK when the backup operation suceeded. 

11. Close the application and restart the system. 

12. On your system open the directory where you backup the drive. Here you could see that it was compressed. Keep this backup so when your hard drive failed to load your operating system you will just restore it using the same software. 


HOW TO RESTORE YOUR BACKUP?

After Creating a disk image of your system, make sure it will be safe. you could also hide it so no one could make any changes about it, deleting it for example. Also having a copy of it will help. Your backup is your last solution whenever you experience downtime on your unit and no other solutions but to restore its good system. One good thing about this is you don't need to perform again the reinstallation process of your O.S. and other application software which might consume a longer time. Using your disk image you could bring back the system  in good condition and the application software included the time you perform the back up, and it will only take for a minutes depending on your computer performance. 

So let us restore what we back up. Follow these steps: 

1. Run the Acronis True Image. 

2. Select Operations and click Restore.

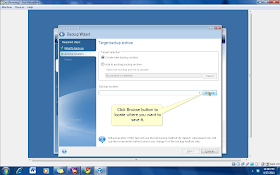
3. Select your back up image. then click Next. Make sure you remember where you saved your back up. Use the browse button to look for it.

4. Select Restore whole disks and partitions so the whole system will be restored. Including the applications software, the settings of your computer and the files saved on that partitions the time you back up.

5. Click Next after configuring the settings for that partition.

6. Use commands set by default then click next.

7. You could see under the summary what you will experience so just click next. Just remember that you need to reboot your computer after clicking the proceed button and the deleting of partitions.

For me, disc imaging is a good backup  and maintenance solution for a computer shops, for offices with a number of computers having different specifications. This will save you during your downtime. Personal computer users could also perform disk imaging and restoration so their work will be continue quickly after the restoration. 
Enhanced by Zemanta